Sometimes there’s a draw back in owning a brand new Mac computer—you start afresh. It simply means that you need to transfer some of your files into your new device and this includes your Apple Mail.
There are several methods in transferring your Apple Mail from which Apple’s Migration Assistant was deemed the easiest. However, the lack of modification or choices when transferring mail may deter you in using this service. You may also lose some important data in the process or copy a bad file that can jeopardize the may cause you problems. On the other hand, a new start also means that you don’t have your old files, you lose your Mail rules and the new system may even ask you your long forgotten passwords.
So here’s a treat for you and all you have to do is to acquire the following beforehand:
- Storage device(s) where you can store the files momentarily for transfer. It could be a DVD, CD, USB flash drive, external hard drive, etc. If you merely performed a clean install on your OS X, we guess that you saved those files in a hard drive partition.
- Administrative access to your data to ensure there won’t be any problems in file transfer.
Directions
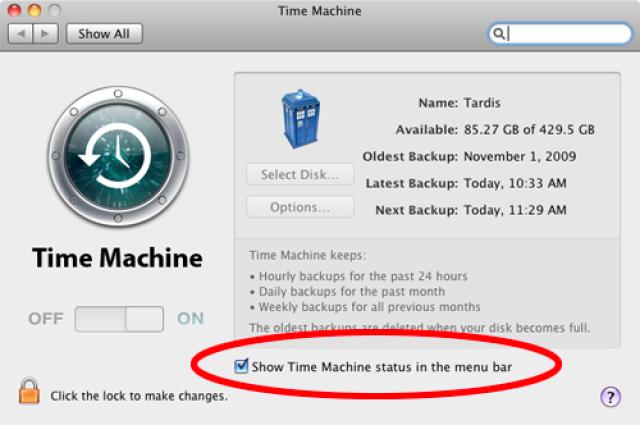
- Back up your data using Time Machine by simply selecting the Back Up Now item from the Time Machine in the menu bar. Just in case you don’t have the Time Machine icon, just perform the following:
Launch System Preferences>>Time Machine>> tick on Show Time Machine status in the menu bar>>Close System Preferences.
- Copy both Apple Mail folder and Apple’s Keychain application. But first, you need to repair your keychain files.http://macs.about.com/od/usingyourmac/ss/moving-apple-mail.htm
- Open Applications/Utilities>>Keychain Access>>Keychain Access menu >>Keychain First Aid.
- Input your user name and password of the account you are presently logged in with.
- Select Repair, click on the Start button and wait for the process to be completed.
- Clean up your Apple Mail by simply erasing the Junk Files.
- Rebuild your Apple Mail by selecting a mailbox and Rebuild. You can repeat the process to each of the mailbox available.
- Copy your Mail files or Mail Preferences by quitting from your Apple Mail (if it’s running) and open the Finder window. Navigate to username/Library/ and copy the Mail folder to the same location. For Mail Preferences, copy apple.mail.plist to the new location.
- In case of problems with your keychain, you can troubleshoot by performing:
- Go to /Applications/Utilities then launch Keychain Access>>Edit menu>>Keychain List.
- Note which files have a check mark on the box next to their name then uncheck them.
- Repeat the instruction on Step #2 and copy the Keychain files to your New Mac or system.
- Reset the check marks in the Keychain list (the ones you noted) and you’re all set.
- If you’ve seen an error message in the first launch of your Apple Mail in its new environment, make note of the files listed under the error message. Usually the culprit to this is the username/Library/Mail/Envelope Index.
- If your Apple Mail is currently open, then close it.
- Open a Finder window by simply clicking on the Finder icon in the Dock.
- Go to the file that was mention in the error message then right click it in the Finder window.
- Click on Get Info from the pop-up menu and once inside, expand the Sharing & Permissions item.
- Your user name should be listed as having Read & Write access; but since the account ID between your old Mac and the new system are different, you may find your account name listed as “unknown.” In order to change the permission, you can do the following:
- Click on the lock icon located at the bottom right corner of the Get Info
- Input your administrator username and password then confirm by clicking the OK button.
- Next, click the + (plus) button wait for the Select a New User or Group window to open.
- Click your account from the list of users shown and then click Select.
- The chosen account will then be added to the Sharing and Permissions
- Choose the Privileges item for the account you just added in the Get Info
- From the dropdown menu, choose Read & Write and if you’ve seen an entry described as unknown, simply select it and click on the – (minus) sign to delete it.
- Close the Get Info window and check if the error has been corrected. If Apple Mail reports another error for a different file, just do the previous steps until they are all corrected.
- To circulate your privileges, start with a right-click on the Mail folder from username/Library/and commence with the following:
- Using the steps on number 4, add your username to the Permissions list and you can then set your permissions to Read & Write.
- Click on the gear icon located at the bottom of the Get Info window and select Apply to enclosed items.
- Close the Get Info window and try opening your Apple Mail again.
