
Mageia is based from a major Linux distribution called Mandriva (formerly known as Mandrake). If you are interested in trying out Linux distributions like Mageia, you will find this tutorial helpful for you.
Note however, that this USB drive is bootable on UEFI bootloaders found in OS versions in the likes of Windows 8 and above. Without further ado, follow the instructions below to create your USB drive:
Directions
- Download the latest version Megeia from this link but make sure that you choose the Live Media version.
- You will be presented with two options: the LiveDVD image or the English only CD from which you should choose the former (LiveDVD).
- You will be presented again with two options: KDE or GNOME. Here, you can choose either but our tutorial will be based on the GNOME option.
- Again, you will be presented with two options: the 32-bit or the 64-bit computer. Choose which kind of computer you have so you should know if you have a 32-bit or the 64-bit kind.
- Finally, you need to choose between direct link and a bittorrent If you don’t have a torrent downloader, simply choose the direct link. The ISO for Mageia will then be downloaded to your computer.
- Now, on the Mageia website, you will need to acquire tools for a bootable USB Drive. Get to choose between Rufus and Win32 Disk Imaging Tool. In this tutorial, we are using the latter oen, the Win32 Disk Imaging Tool.
- Download and install Win32 Disk Imaging Tool (just follow the on screen instruction in installing the tool).
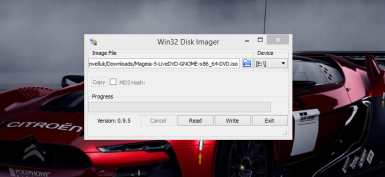
- If you left the checkbox for Launch Win32DiskImager ticked while downloading the software, you should now have a screen that mirrors the one on the image. Meanwhile, if the tool has not started, just feel free to double click the icon on your desktop.
- Insert a blank USB drive into one of the USB ports of your PC.
- Click on the folder and download the Mageia ISO image from our first step. Remember that you will need to change the drop down settings that read disk images to show all files.
- Change the device drop down in order to show the drive letter that signifies your USB drive and then click Write.
- You can now boot into the Live USB drive but first, note the following:
- If you’re booting on a computer with standard BIOS, just reboot your computer and select the Boot Mageia option from the menu.
- If you’re booting on a computer with Windows 8 or 8.1 OS, you must turn off the fast startup mode.
- Now, hold the shift key on your keyboard and reboot the computer while the USB drive is still inserted in the port. A UEFI set up screen should appear from where you should choose EFI drive. Choose the Boot Mageia option from the menu and you’re off to the start.
- Finally, set up the Live Environment by simply agreeing to the Terms and Condition and filling up information such as the timezone, appearance and keyboard lay out. Done!